Sunday, June 20, 2010

The 3 sacred alphabets - P, B and J.


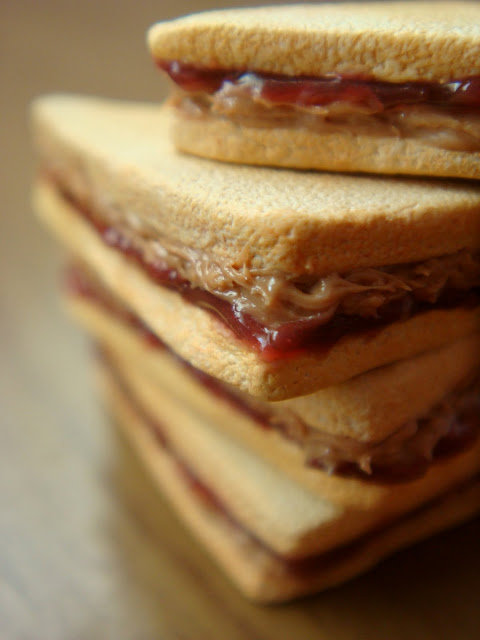
One of the things I enjoy most in the entire process of crafting miniatures - is when I get to create molten, liquid items. It's utmostly satisfying to beat the crap out of both solid clay and liquid clay, and watch the ugly lumps miraculously form beautiful swirls in the end. They often resemble the real-life items so much, I just want to lick them off my work-slab. (But PLEASE don't!) Such items include liquid egg white, cream soup, cupcake frostings and of course, sandwich spreads.


And what spread would be more notorious than the almight duo - Peanut Butter & Jelly.You can almost smell the delectable fusion of nutty and fruity, can't you!


I was mad hungry while slathering on the spreads on the miniature toasts, and I worked late into the night. Oh, how I craved for a PB&J at that time!


Food manufacturing giants have long latched on to this delicious concoction, and came up with the convenient bottle of peanut butter and jam, readily mixed. I too, have a bottle in my house, having succumbed to the fast-food world we have now become. But as most good things are, the old-fashioned method usually produces the best results. That's why I made mine (minature ones) with a thick slap of peanut butter, and an equally generous spread of jelly.

 Measurements: 3.2cm (longest side of halved sandwich), 0.7cm in height.

And if anyone's missing this bright-eyed cutie, here's a bunch of photos showing Ai, munching on her teatime treat.


That's it. I'm digging into that pre-mixed bottle of PB & J now, ciao! :)

Saturday, June 12, 2010

The one where I plead and beg.

Update:

It turns out that non-Singaporeans can't vote, because registration requires a NRIC number. :( Thank you to all of you who tried though, it's really sweet. :) To the Singaporean readers, I need your support even more now! -kowtows.


========================================================


I really am beating myself up for taking the longest time ever to write this post.

This humble 18-months blog of mine, has been nominated as a finalist in the Singapore Blog Awards.

Honestly, I have no clear idea of how it all happened.

One day, out of the blue, my cousin texted me, "Hey, do you know your AiClay website is in some blog awards?" Which I didn't.

And so immediately, I pounced on a computer and conducted a Google search, which easily pulled up the fact that AiClay has indeed been nominated as a finalist in the E-commerce category in the Singapore Blog Awards.

After reading through the selection process, I was feeling extremely flattered that a panel of judges had actually chosen my blog, together with 9 other finalists, amongst many others who had registered or been nominated.

Until now, I still do not know who had registered for AiClay, but I thank you, whoever you are. :)

So now, here comes the pleading and begging.

Here onwards, besides the 70% weightage given to judges, a heavy THIRTY PERCENT rests on votes by the public, namely you!

If you're one of the lovely 172 people following the blog, or if you've just popped by and enjoyed my writings and photos, it would mean a lot to me if you could cast a vote of support for me.

========================================================

STEP BY STEP 

Register here as an OMY user. (this takes about 1 minute.)

After activating your account through your email, log in.

Head to the Categories & Nominees page, click on the E-commerce category at the side.

Search for my banner picture, I've circled the portion you need to look at!


Place your cursor on the vote banner, it will turn from pink to green! Now just click!
Note that if you click on the picture outside of the vote banner, it would lead you back to this blog instead.


A pop-up window will ask to confirm if you want to vote for AiClay, just click Yes.

Voila, you're done! :)


========================================================

Even if you're not the least bit interested in showing your support, the website is a treasure trove of carefully hand-picked blogs, even separated into categories like 'Best laugh-out-loud', 'Best Modeling' etc. What more can a bored Internet user want! :)

To sum up my emotions for this post.


Pretty please, vote for me? :)

P.S Every OMY member gets a fresh vote everyday, and voting ends 31st June 2010!

Sunday, May 23, 2010

it's where you keep your bread.

It's really a bummer, that I haven't had more time to blog, or to create, due to my full-time job. 

Nowadays, I keep getting reminded of a time not long ago, when I was as free as a bird, and could sculpt as and when I felt like it.


And then I'll beat myself up over the times I chose playing games on the computer, or watching telly over making miniatures.

The last few weeks, I tried sneaking in any free moments I have, to work with wood. Granted, I was still sitting in front of the telly, catching up on my favourite shows. But at least my hands were kept busy! Hah! I was blown away by this awesome tutorial created by the kind Lauretta of CDHM, and had to have a go at it. Besides, with all the miniature bread I had made, it was high time for a miniature breadbox.


 I had no other wood except for ice-cream sticks/craft sticks, which were all pre-cut into long, thin strips. This made it hell difficult as the breadbox definitely required wood which were wider than that of a craft stick, and so I had to tackle this problem before even starting on the project.


So for the rest of you who also can't get nice, big wood pieces to work with, here's a tip. Never mind that you're combining different widths of wood to form the size you need, you just have to etch out lines along the entire piece, and nobody would be the wiser! 

Okay, I don't know if that made sense at all. But if you look at the photos below, just note how the pieces of wood appear to have etched lines all over. That's to disguise the ugly line due to combining wood pieces of different sizes. :)


Oh, over here I should probably bring up the fact that the lid, actually rolls up and down like a proper roll-top bread box! It is a frikking awesome technique, and you just have to hop over to Lauretta's tutorial to see how it's done! :)
 

This is how it probably looks like after breakfast at my house. EMPTY. :)


Hoho, the breads are sneaking a peek to say hello!


I could roll this lid up and down forever. Haha, it is THAT smooth. I almost wanted to take a video just to showcase how amazing that lid is!


The bread box measures 3cm or 1 3/8 inches in width and 1.9cm or 3/4 inches in height. 


And yes, that's my fat finger.

Monday, April 26, 2010

The idiot's guide: How to make a miniature lunch bag.

Hoho! 

It's a glorious Sunday here, and today will be the FIRST time I'm creating a photo tutorial!
Actually, it's the first time I'm creating a tutorial of any kind.

Solemn apologies for any mess-ups, missed details or dirty fingernails. Ahem.

Today, we conquer..
THE MINIATURE LUNCH BAG.

-wields sword and charges at army of lunch bags.


Before I start, let me just say that I am sure many of you have made miniature bags before, and this project is probably at a difficulty level of 0.0001 upon 100. Seriously. But I'm still going to go ahead and post this write-up, hoping that someone out there will benefit somehow. :)

For people who are seeking the short-cut, here.

For everyone else, let's start! :)

First, we will need some clean brown papers. They could be in the form of real life lunch bags, or brown envelopes. So do flip through your mail for anything you can save before you chuck them all in the bin!


And then we need the usual craft items.

A pair of good, sharp scissors. (or penknife/craft-knife if you prefer)
A sturdy ruler.
A well-sharpened pencil.
White glue, or any glue that will bond paper to paper. Or even double-sided tape.


Now choose your preferred brown paper and cut out a rectangle measuring 5cm in length and 3cm in width.


Using your ruler and pencil, measure and draw out the guiding fold lines below on the rectangle.


All measurements are in cm. 
Note that you may change measurements according to your preference for a bigger/smaller/longer bag. Experiment with various sizes! :)

(please pardon this crudely photoshopped image!)

  (click to enlarge)

Fold the rectangle along all the guidelines and make sure that folds are all in the same direction, i.e all folded in/out.

Score the folds by dragging your ruler along them.
This might seem like an unnecessary step, but it is crucial in making your fold lines crisp and neat.


Erase the guidelines after folding, and draw an additional guideline as shown. 
Cut out sections as shown below.

The additional guideline is for the serrated edge of the lunchbag.


 Snip away diagonally, making little diagonal cuts which stops before the guideline. 
Leave the shaded portion uncut.


 Snipping away in the opposite direction, you will have a serrated edge, which will be the open side of the lunch bag.


Erase the shaded portion, and apply glue/tape on the sections shown below. 
Fold lunch bag together, applying slight pressure on the glued portions.


 Now, snip according to the existing serrated edge for the overlapped portion (which is the shaded portion).


 Your lunchbag is almost ready! :)


 Fold halfway in for both sides, so that the lunchbag can lie flat.


Hooray! Now you can make many many more lunchbags for your miniature food. :)


 For people who have no time to read through my long-winded instructions, 
here's a quick step-by-step evolution of the lunchbag.

(click to enlarge)

Now you just have to fill these nice brown bags up! :)


I'm thinking apples, french loaves, a slim wine bottle. How about you? :)

Sunday, April 18, 2010

Deja vu.

Why, you may ask, am I talking about sandwiches again?

(okay maybe the first question might be why did I even ask this riddle, which totally fell FLAT.)

Well, I found it only befitting since I just shoved down a ham-lettuce-sandwich for breakfast just a few minutes ago. That, and the simple fact that these are the only new photos I have in my AiClay folder.


And no, this ain't just one of the sandwiches here
This sandwich is actually scaled down about 3 times, and measures at around 1cm in length. 


Long silence. 


Wow, I think I've exhausted everything I wanted to say about sandwiches. 


Sometimes I think I take too many photos of one single subject. No?


Now you see it.


Now you don't. 

(Okay fine fine, you still do.)


The following series of photographs is titled 'Lunchbag swallows sandwich'.

I'm starting to fall in love with paper crafts. 

There is something numbingly satisfying about folding, cutting, scoring and pasting.
And then repeating the whole cycle over and over again.


A full grocery bag, packed with AiClay purchases.


I feel like I owe all of you readers for just getting through my awkwardly written posts.

I think I would present a tutorial for miniature grocery bags next, how about that? 

I know they sound awfully simple to make (which they are actually). 
But hopefully there are some tips that I can still pass on to you guys.

Till the next entry! :)

Thursday, April 8, 2010

The pau with the red dot.

We Chinese are really fond of our paus, or also known as buns. 

So much that we stuff these little white puffs with various kinds of fillings, from the basic bean paste, to savoury meats, to hard-boiled eggs.

And then, with all that variety, of course you would have to start finding ways to differentiate them when the fillings are all hidden, warmly tucked away underneath their powder-white exteriors.


To solve that problem, colourful dots now decorate the tops of paus. 

A yellow dot for bak pau - chicken meat filling. A pink dot for lian rong pau - lotus paste filling.

And the all-time favourite, a red dot for char siew paus - sweet pork filling. 


 Some mornings, my mom would steam different paus for breakfast. And the char siew paus would ALWAYS run out very quickly, with me and my brother fighting for the last one. :)

The love for char siew paus has now extended to them having their own jokes. 
Here's one. (Disclaimer: It is VERY lame.)

Char siew pau and man tou (a plain bun) went to catch a sad movie, but only char siew pau came out crying. Why?
Think think!


I know a lot of you should be able to guess this!


Alright I'll spill the answer..


It's because char siew pau has feelings (fillings) but man tou didn't!


.......

-awkward silence.


Sorry guys, I won't tell bad jokes no more. -sniggers.